Advance Help Center Advance Help Center
  • Getting Started
    • User Onboarding Quick Steps
  • Reviews
    • Reviews Overview
    • Reviews List View
    • Reviews Automation
    • Reviews to Write- Bookings List View
    • Reviews Dashboard
    • AI Review Insights Overview
  • Integrations
    • Zapier Integration
      • How to create Zap using AdvanceCM Autopilot feature?
      • AdvanceCM Integration with Zapier
    • Connecting ChargeAutomation to AdvanceCM
    • Connecting Check-in Scan to AdvanceCM
    • Connecting Chekin to AdvanceCM
    • Connecting Touch Stay to AdvanceCM
    • Connecting KeyNinja to AdvanceCM
    • Connecting E-Visitor to AdvanceCM
    • Connecting Operto to AdvanceCM
    • Connecting Lula.Cleaning to AdvanceCM
    • Connecting Jervis Systems to AdvanceCM
    • Connecting Cleanster.com to AdvanceCM
    • Connecting MovingLake to AdvanceCM
    • Connecting Opiniion to AdvanceCM
    • Connecting Doinn to AdvanceCM
    • Connecting PriceLabs to AdvanceCM
    • Connecting Truvi to AdvanceCM
    • Connecting Turbosuite to AdvanceCM
    • Connecting Paraspot to AdvanceCM
    • Connecting Slack to AdvanceCM
    • Connecting Aipex to AdvanceCM
    • Integrations Overview
    • Connecting InsuraGuest to AdvanceCM
    • Connecting Minut to AdvanceCM
    • Connecting Duve to AdvanceCM
    • How do I connect to MailChimp?
    • Connecting Dropbox to AdvanceCM
    • Connecting Yada to AdvanceCM
    • Connecting Operto Teams to AdvanceCM
    • Connecting Wheelhouse to AdvanceCM
    • Connecting Boostly to AdvanceCM
    • How does the Mailchimp integration work?
    • Connecting Turno to AdvanceCM
    • Connecting Alertify to AdvanceCM
    • Connecting GuestFlow to AdvanceCM
    • Connecting StayFi to AdvanceCM
    • Connecting Safely to AdvanceCM
    • Connecting HKeeper to AdvanceCM
    • Connecting Beyond to AdvanceCM
    • Quickbooks integration with AdvanceCM
    • BetterSTR Integration with AdvanceCM
    • Get Clearing integration with AdvanceCM
    • Trustd Integration with AdvanceCM
  • User Settings & Logins
    • Account Info Preferences
    • User Type and Permissions Overview
    • User Settings Overview
    • Multi-Factor Authentication (MFA) Overview
    • Account Info Overview
    • Reset Password
    • Adding Payment Gateways using MFA
  • Rental Settings
    • Multi Unit rental relationship
      • What is difference between Main Unit Rental and Sub Unit Rental?
      • Major Differences between Multi-Unit Rental and Parent Child Rental Relationship
      • How does the Multi-Unit feature works?
    • How does the Parent Child Rental feature works?
    • How Do I Add and Update Rentals?
    • Rentals Overview
    • How Do I Create a Custom AdvanceCM Email Address?
    • Linking Rentals Together
    • How Do I Add Fees to my Rental?
    • How do I delete rentals?
    • How Do I Change My Rental Currency?
  • Calendars
    • Import External Calendar
    • Standard Calendar
    • Multi Calendar Overview
    • Hold Events Overview
    • Planning Calendar
    • Agenda Calendar
  • Inquiries and Bookings
    • How to Send Quotes
    • How Do I Delete an Inquiry
    • Messages Feed
    • Inquiry Inbox Overview
    • Inquiry Overview
    • Guests Overview
  • Widgets
    • Add the Interstitial Widget to a Site
    • Inquiry Widget Advanced Configuration
    • Search Widget Advanced Configuration
    • Add the Search Widget to a Site
    • Add the Calendar Widget to a site
    • Add the Booking Widget to a Site
    • Booking Widget Advanced Configuration
    • Add the Inquiry Widget to a site
  • Subscription & Billing
    • Billing Info Overview
  • Websites
    • Guest Portal Overview
    • Custom Domains With AdvanceCM Websites
    • Booking Engines
    • Custom Domains With AdvanceCM Guest Portal
    • Creating a website with Website Builder
    • Securing your Custom Domains
    • Website Analytics and Tracking
  • Operations
    • Tasks
      • My Tasks Overview
      • Tasks List View Overview
      • Tasks Calendar
    • Vendor Web Application
    • Vendor List View
    • Inventories Overview
    • Incidents Overview
  • FAQs
    • Multi-Unit Rentals Relationship FAQs
    • Parent- Child Rentals Relationship FAQs
    • Reviews FAQs
    • Advance Intelligence FAQs
    • General FAQs
    • Channels FAQs
    • Smart Devices FAQs
    • MFA FAQs
    • Automations/Autopilots FAQs
    • Messaging Apps FAQs
  • Autopilots
    • Tasks Autopilot Wizard Overview
    • Guest Autopilot Wizard Overview
    • Extras Autopilot Wizard Overview
    • Reviews Autopilot Wizard Overview
    • Rates Autopilot Wizard Overview
    • Messages Autopilot Wizard Overview
    • Inventories Autopilot Wizard
    • Expenses Autopilot Wizard Overview
    • Locks Autopilot Wizard Overview
    • Charges Autopilot Wizard Overview
    • Invoices Autopilot Wizard Overview
    • Autopilot Wizard Overview
    • Bookings Autopilot Wizard Overview
    • Documents Autopilot Wizard Overview
    • Credit Card Autopilot Wizard Overview
    • Incidents Autopilot Wizard Overview
  • Rate Management
    • My Rates are Too High on Booking.com
    • What is a Rate Category?
    • My Rates are Too Low on Booking.com
    • Pushing Rates to API Channels
    • How to Set Up Distinct Rates for Channels
    • How to Set Day-Specific Pricing
    • Changing the Max Guests value on Booking.com
    • What is a Dynamic Rate?
    • Changing the additional guest fee on Booking.com
    • What is a Standard Rate?
    • Rates Overview
    • Rate Determination Algorithm
    • Troubleshooting Rates
    • What is a Base Rate?
  • Settings
    • Payment Gateways
      • Booking.com and Expedia payment details
      • How to connect with Stripe Payment gateway?
      • How to connect with Peach Payment gateway
      • How to connect with Paypal Advance?
    • Data Feeds
    • Payments Overview
    • Data Feeds Overview
    • Payment Rules Overview
    • File Cabinets Overview
    • Email Options
    • Branding Info Overview
    • Shared Content Overview
    • Stealth Overview
    • AdvanceCM Data Dictionary
    • Custom Codes Overview
    • Templates Overview
    • Web onboarding Flow for AdvanceCM users
  • Smart Devices
    • Smart Devices Setup
    • Smart Devices General Settings
    • Smart Devices Overview
  • Channel Manager
    • iCal Connections
      • Connecting iCal Channels
      • Export your AdvanceCM calendar to Holidaylettings
      • Connecting to Flipkey/Tripadvisor with AdvanceCM
      • What if my channel is not listed in AdvanceCM?
      • Connecting to Homeaway/VRBO with AdvanceCM
    • Airbnb
      • How to apply 20% discount promotions in Airbnb Bookings
      • Airbnb Price Settings
      • How Do I Disconnect my Airbnb Listing or Account from AdvanceCM?
      • Airbnb Host Alteration
      • Airbnb Guest Alteration
      • Creating Listings in Airbnb
      • Requirements for an Airbnb Rental
      • Connecting to Airbnb API
      • Airbnb 2-way API Sync
      • Connecting to Airbnb via iCal
      • Airbnb Opportunities, Reviews & Notifications
      • How to Rank Higher on AirBnB
      • Airbnb API FAQ
      • How do I refresh my Airbnb property list?
      • Creating an AirBnB Password
      • Airbnb Booking Settings
    • Agoda
      • Connecting Agoda with AdvanceCM
    • Expedia
      • How to connect Expedia Messaging with AdvanceCM
      • Connecting Expedia with AdvanceCM
    • Rentals United
      • Connecting Rentals United to AdvanceCM
    • Tiket
      • Connecting Tiket to AdvanceCM
    • Google Vacation Rentals
      • Google Vacation Rentals FAQs
      • Connecting to Google's Vacation Rental platform
      • Google Vacation Homes - Fixing Rental Errors
    • Booking.com
      • How to edit listing for Booking.com inside ACM
      • How to add listing for Booking.com inside ACM
      • Connect to AdvanceCM via the Booking.com Extranet
      • Pushing rates to Booking.com
      • Booking.com Rates and Additional Guest Pricing
      • Sending Booking.com messages with AdvanceCM
      • AdvanceCM And Booking.com Best Practices
    • HVMI
      • Marriot Discounts
      • How Marriott handles Booking Fees
      • Connecting HVMI to AdvanceCM
      • HVMI Requirements and FAQ
    • VRBO
      • VRBO Bed Syncing
      • Setting Rates and Fees in AdvanceCM for Vrbo
      • VRBO FAQs
      • Activating AdvanceCM Rentals on VRBO
      • Connecting Vrbo to AdvanceCM
    • Trip.com
      • Connecting Trip.com to AdvanceCM
    • Holidu
      • Holidu API Requirements and FAQ
      • Connecting Holidu to AdvanceCM
    • Channels Overview
    • Adding Custom Channels
    • Adding Commissions for Channels
    • How to connect Hopper Channel with AdvanceCM?
  • Documents
    • Documents Templates
    • How to create Documents?
    • Documents Preferences
  • Finances
    • Expenses
      • Importing Expenses
      • Expenses Overview
      • Expense Settings
    • Invoices
      • Invoice Overview
      • Invoice Templates
    • Charges Overview
    • Extras Overview
    • Booking Formula Overview
    • Discounts Overview
    • How to setup Security Deposits?
  • Messaging Apps
    • Messaging Apps Logs Overview
    • AdvanceCM Unified Inbox
    • Messaging App- Gmail
    • Messaging App - WhatsApp
    • Messaging App- SMS
    • Messaging App - Facebook
    • Messaging App -Instagram
    • How to add Custom Phone Number?
  • Advance Intelligence
    • AI generated Incidents & Task Approval Workflow
    • AI based Search
    • AI driven Actions
    • Activating Advance Intelligence
    • Advance Intelligence Rental Information
    • Advance Intelligence Credit Recharge
    • Advance Intelligence Ignore List
    • Advance Intelligence Settings
    • Advance Intelligence Introduction & Benefits
    • Advance Intelligence Knowledgebase
    • AI Scheduling Feature
  • Overview
    • AdvanceCM Multi Language Support
    • Push Rates & Availability
    • Dashboard Overview
    • Inventory Search Overview
    • Cost Estimator Overview
  • Automations
    • Rates Automation
      • LOS Discount Automation
      • Group Rates
      • Gap Night Automation
      • Last Minute Automations
      • Channel Adjustments
      • Discount Codes Automation Overview
      • Rates Automation Overview
      • Min Night Stay Automation
    • Expense Automation
    • Documents Automation
    • Task Automation
    • Time Based Triggers
    • Invoice Automations
    • Booking Automation Overview
    • Automations Overview
    • Message Automation Overview
  • AdvanceCM Mobile App
    • AdvanceCM Mobile App: Discounts Module
    • Onboarding flow in Mobile App
    • AdvanceCM Mobile App: Rentals Module
    • AdvanceCM Mobile App: Inquiries Module
    • AdvanceCM Mobile App: Inventories Module
    • AdvanceCM Mobile App: Extras Module
    • AdvanceCM Mobile App: Invoices Module
    • AdvanceCM Mobile App: Tasks Module
    • AdvanceCM Mobile App: Vendors Module
    • AdvanceCM Mobile App: Charges Module
    • AdvanceCM Mobile App: Incidents Module
    • AdvanceCM Mobile App: Expenses Module
    • AdvanceCM Mobile App: Calendars Module
    • AdvanceCM Mobile App: Dashboard
    • AdvanceCM Mobile App: Messages Module
    • AdvanceCM Mobile App: Guests Module
    • AdvanceCM Mobile App: Autopilot Module
  • Power Reporting
    • Power Reporting Dashboard/Control Center
    • Power Reporting: Average Booking Length
    • Power Reporting Revenue Report
    • Power Reporting: Nights Created
    • Power Reporting: Nights Filled Report
    • Power Reporting: Channel Nights
    • Power Reporting: Advance Booking Days
    • Power Reporting: Occupancy Rates Report
    • Power Reporting: Bookings Created
    • Power Reporting: Invoices
    • Power Reporting: Bookings Cancelled
    • Power Reporting: Average Price Per Night Report
    • Power Reporting: Recipients
    • Power Reporting: Channel Revenue Report
    • Power Reporting: Nights Cancelled
    • Power Reporting: Money Paid Over Time
    • Power Reporting: Commission Strategies
    • Power Reporting FAQs
    • Power Reporting: Nights Booked Ahead
    • Power Reporting: Average Booking Price Report
    • Power Reporting: Scheduled Statements
    • Power Reporting: Revenue Generated Report
    • Power Reporting: Statements
    • Power Reporting: Guests Hosted Report
    • Power Reporting: Payments
User Settings & Logins / Multi-Factor Authentication (MFA) Overview /
Website Login

Multi-Factor Authentication (MFA) Overview

MFA stands for Multi-Factor Authentication. Multi-factor Authentication (MFA) is an authentication method that requires the user to provide two or more verification factors to gain access to a resource such as an application, online account, or a VPN. MFA is a core component of a strong identity and access management (IAM) policy. Rather than just asking for a username and password, MFA requires one or more additional verification factors, which decreases the likelihood of a successful cyber attack.

How to Configure MFA?

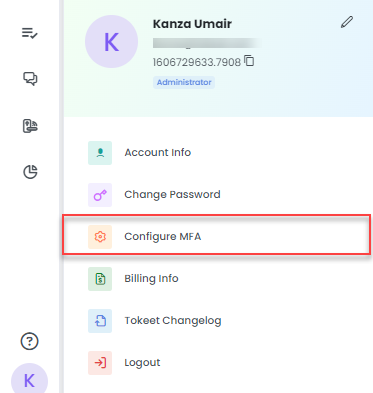
AdvanceCM is always concerned about the security of our users so we have introduced MFA, as you can see in the screenshot below. You can access the “Configure MFA” option by clicking on your profile name in the bottom left corner of the screen.

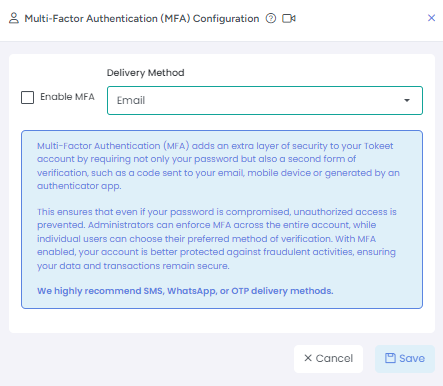
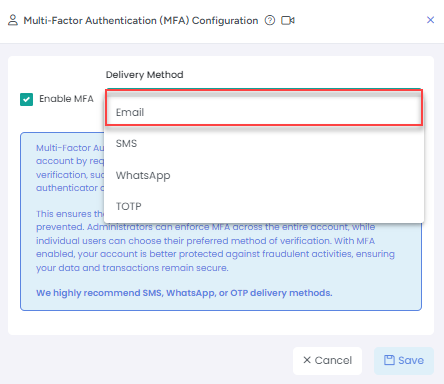
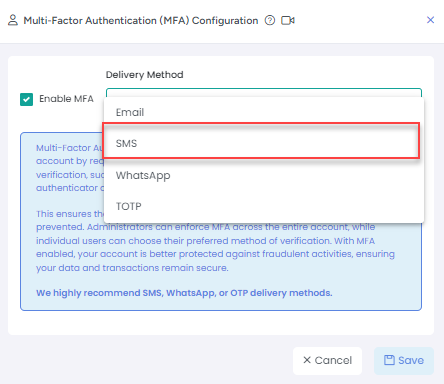
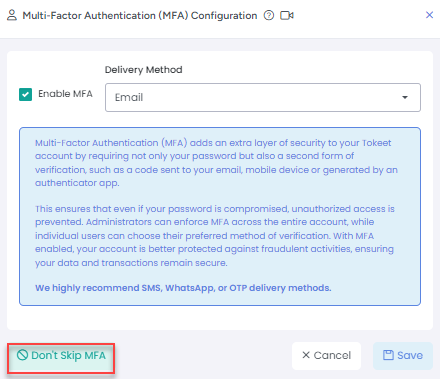
The ‘Configure MFA’ overlay will look like the screenshot below. To Enable MFA click on checkbox, choose the Delivery method (by default Email is selected) & click the Save button. MFA will then be activated on your user account successfully.

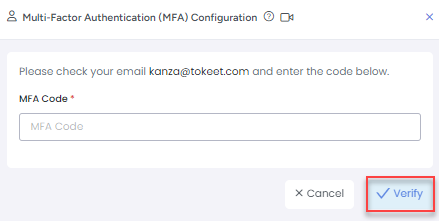
Once you click the checkbox ‘Enable MFA’ and choose Email as MFA delivery method and save, it opens the window below to enter the code which you will receive via Email.

Similarly in the case of SMS, you will get a Code via SMS, with WhatsApp you will get the code via the WhatsApp app and for TOTP, you will receive the code on your Authenticator App.

User level MFA Settings

Each user is able to edit the MFA settings for themselves, although Admins cannot edit MFA for other users. Each user can Enable/Disable MFA settings from two areas for themselves:

1- Configure MFA

2- User Settings

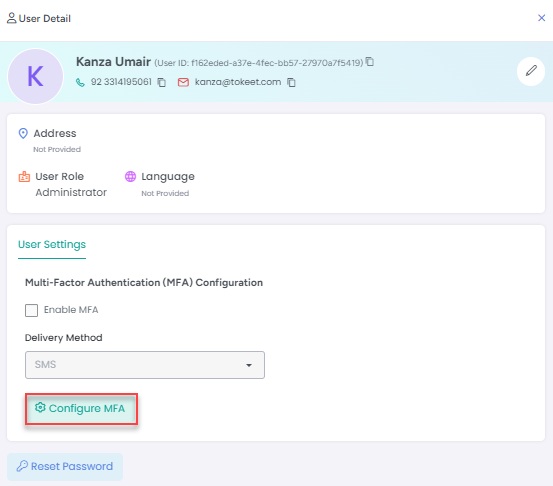
For this option, click on Settings > User Settings then select your user to see the option to enable MFA and click the Configure MFA button as shown below.

Note: Users can only update their own MFA setting.

Account level MFA settings

Note: This Account-level MFA configuration is visible to the Admin role only.

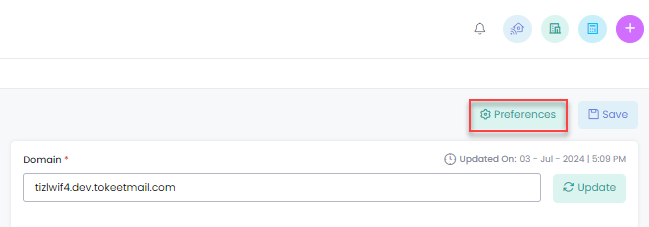
Admins can find the option to enable/disable MFA by clicking on their profile name in the bottom left corner then on the Account Info option and click Preferences button.

You can choose one option & click the Save button to save your preferences. This option is not available for other user roles.

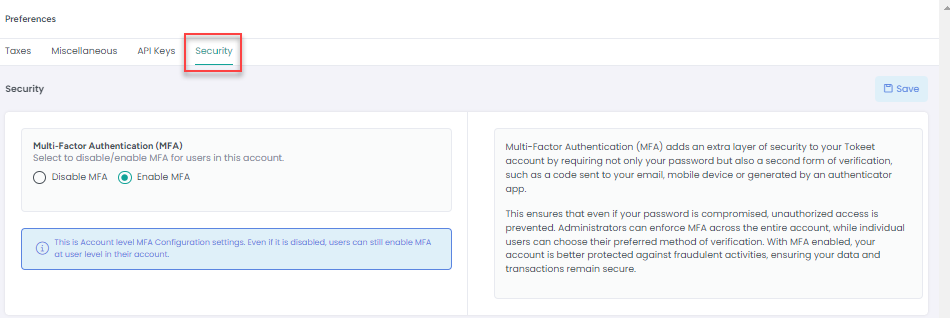
It will open an overlay, where you can click on the Security tab to enable MFA & click the Save button to save your preferences. This option is only available for admin user roles.

Note: If an Admin enables MFA settings at the account level, then user level MFA will be activated, account level settings will override user level settings but the user's delivery method will be the same as they selected before.

MFA Delivery Methods

We provide these four delivery methods to receive a verification code.

1- Email

2- SMS

3- WhatsApp

4- TOTP

Email-based MFA 

If you prefer to receive your authentication code by email, choose Email as the delivery method for MFA on the configuration screen and click the Save button.

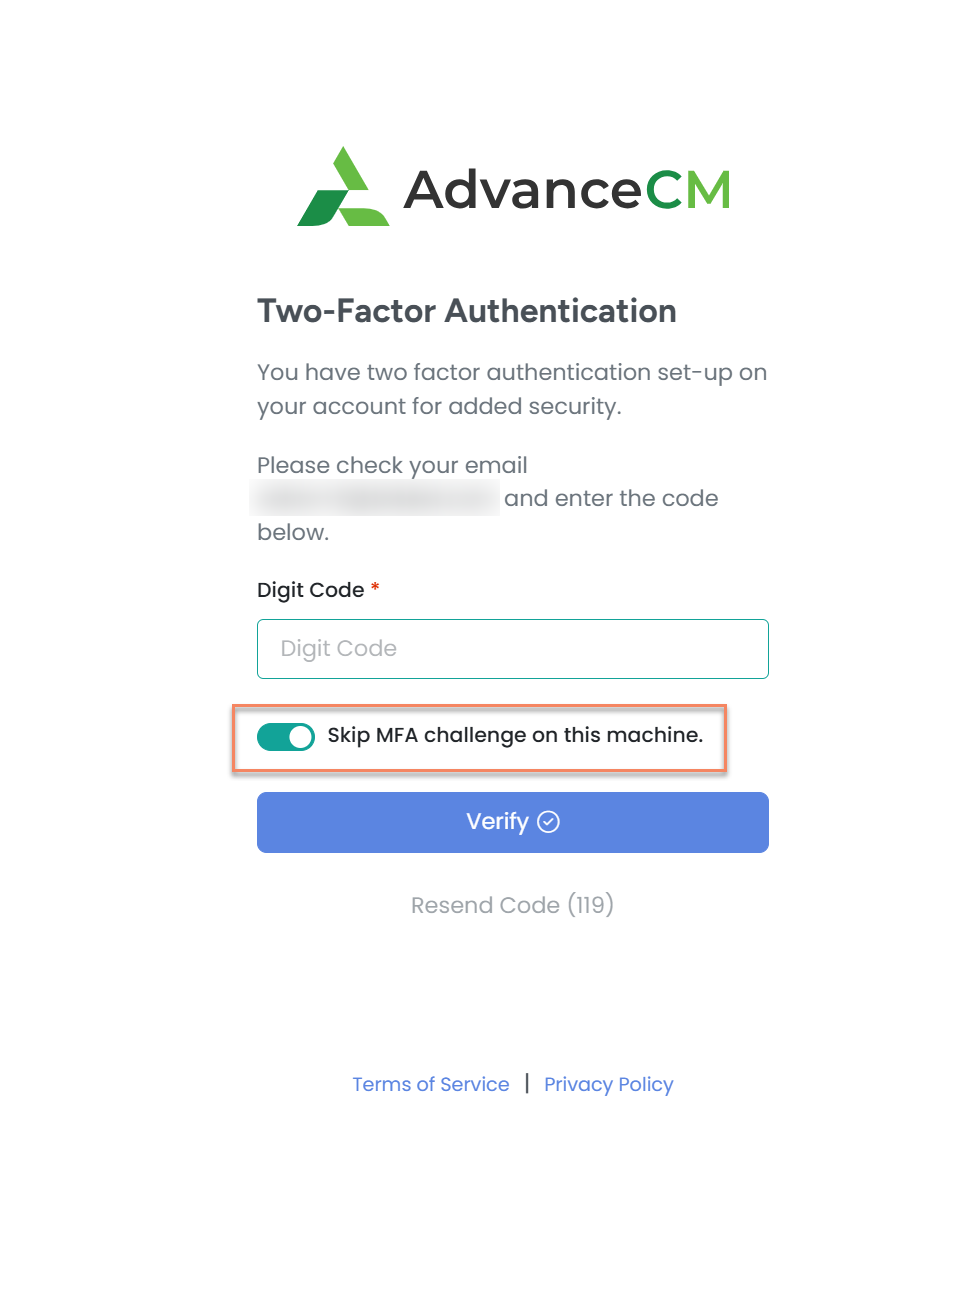
After selecting Email as delivery method, if you logout and go to the login screen you will see the message below after entering your username/password.

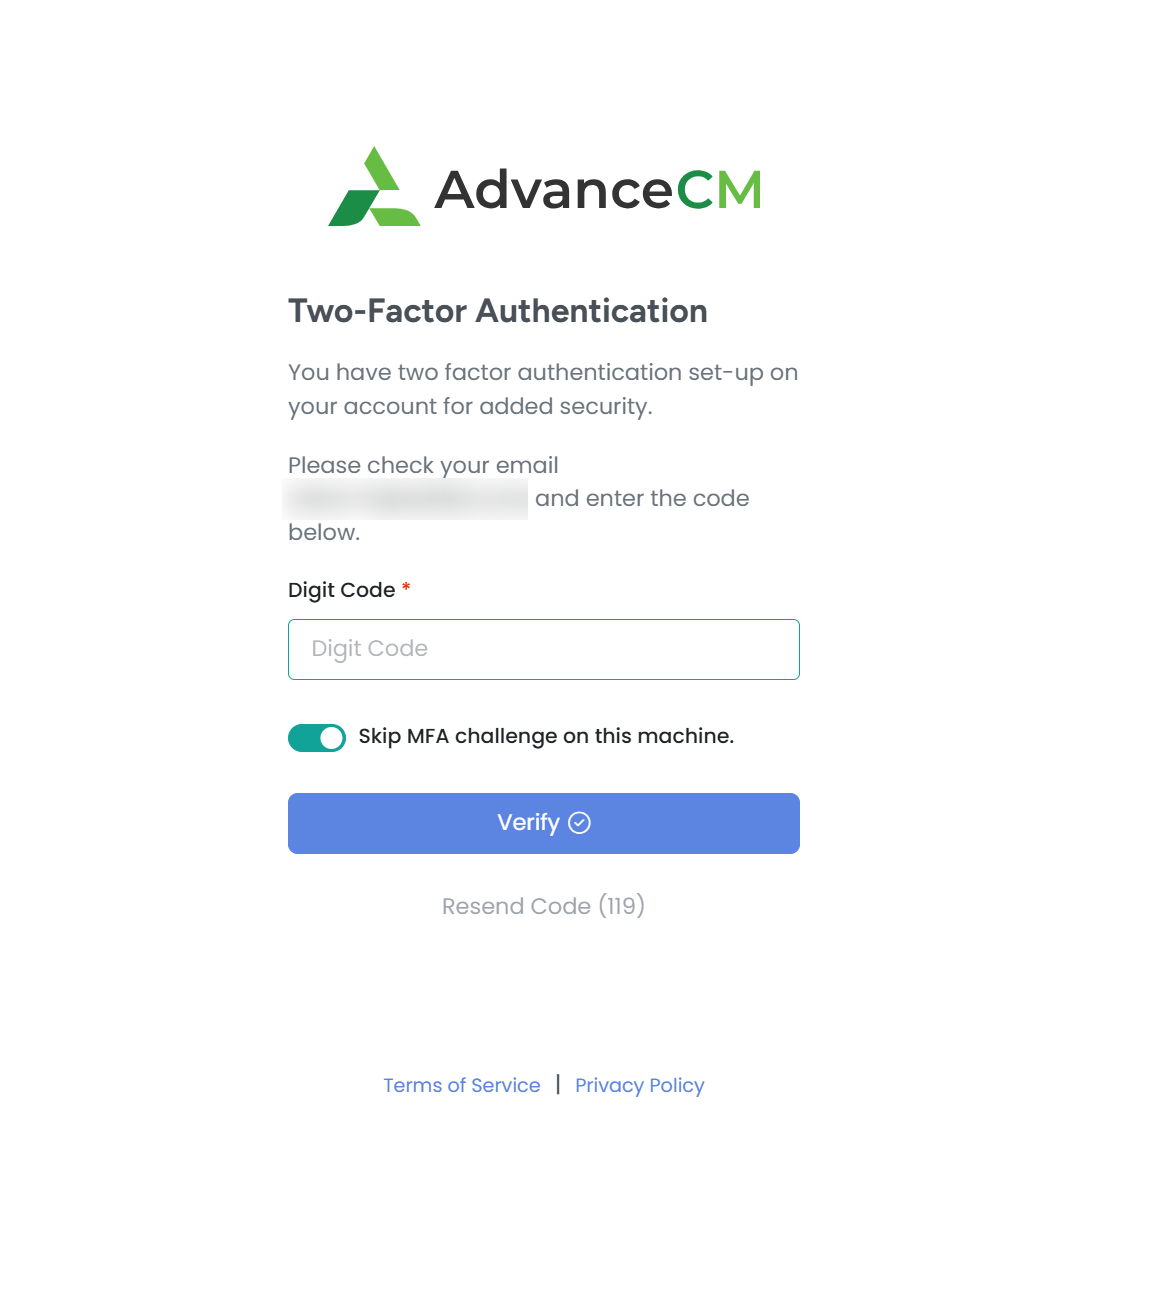
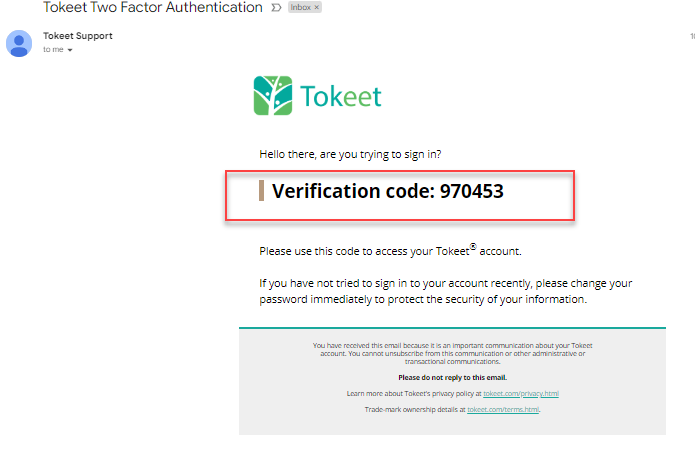
After entering your login details, you will get an email to your inbox with the security Digit Code as shown in the screenshot below. Copy this code, enter it in the Digit Code text field & click the Verify button to be logged in successfully.

SMS-based MFA

If you prefer to receive your authentication code by SMS, choose SMS and click on the Save button.

After selecting SMS as the delivery method, if you log out and go to the login screen, you will see the message below after entering your username/password.

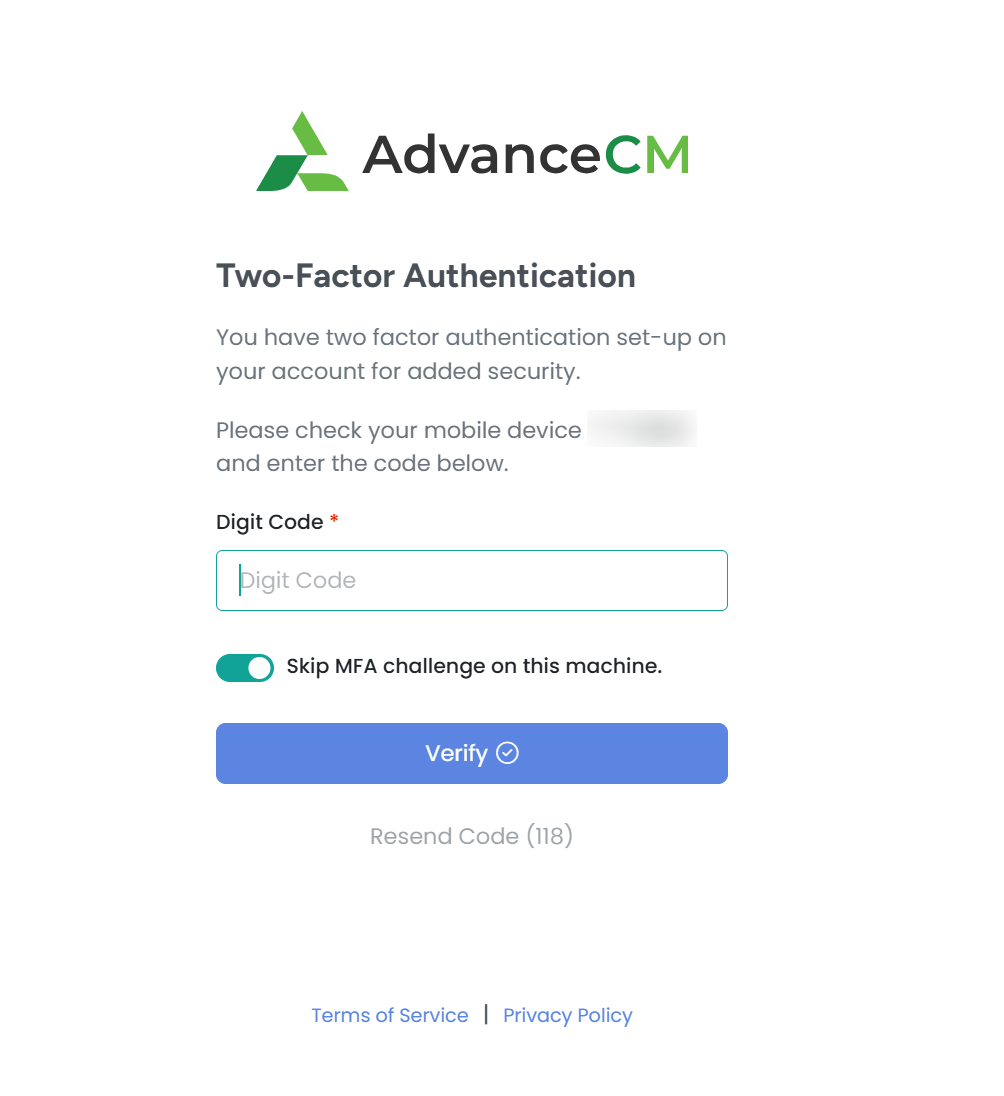
After entering your login details, you will receive an SMS on your saved mobile number with the security Digit Code as shown in the screenshot below. Copy this code, enter it in the Digit Code text field & click the Verify button to be logged in successfully.

WhatsApp-based MFA

If you want to use WhatsApp as the delivery method for MFA, then on the configuration screen, select WhatsApp and click the Save button.

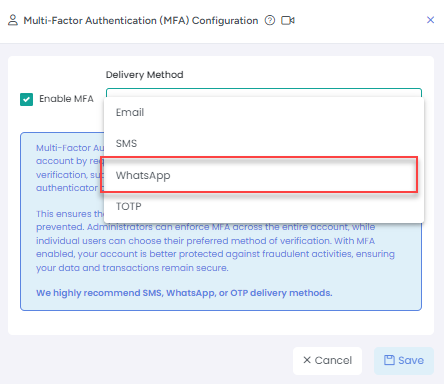
After selecting WhatsApp as the delivery method, if you log out and go to the login screen you will see the message below after entering your username/password.

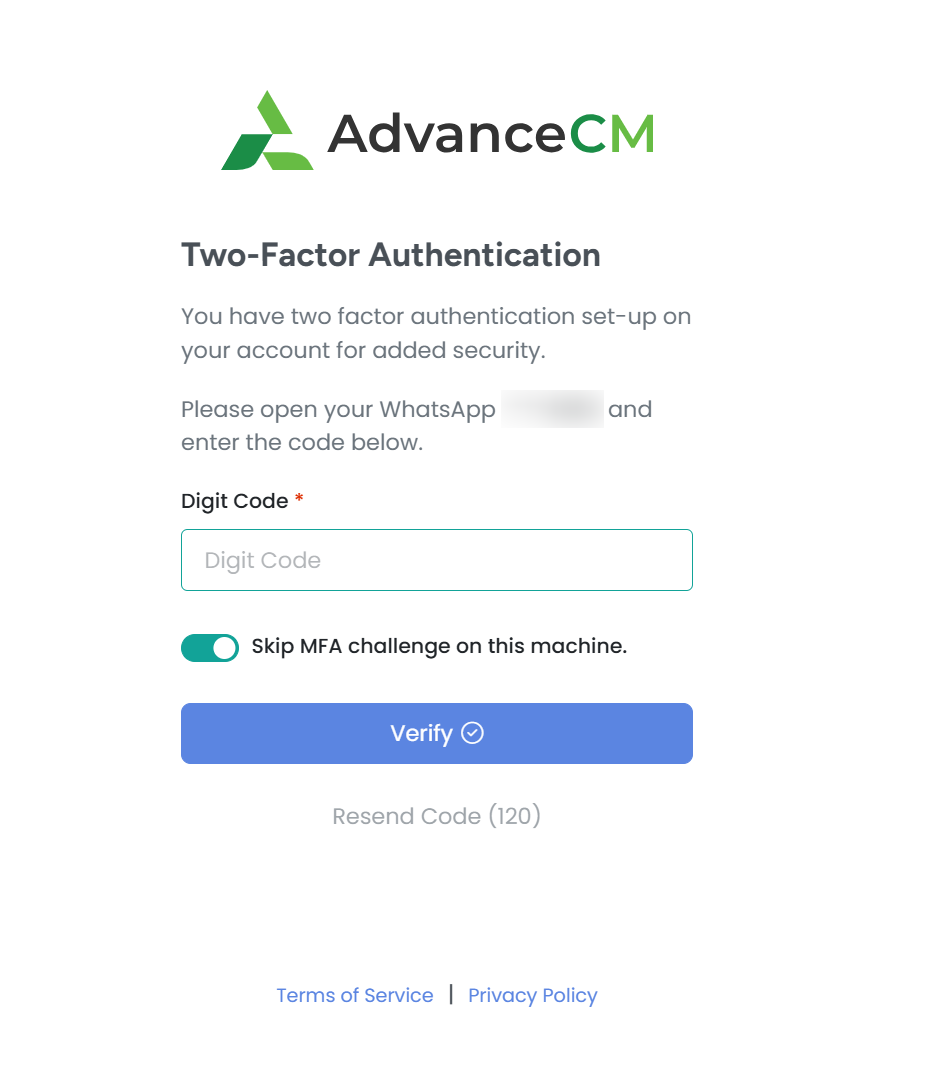
After entering your login details, you will get a message on your saved mobile number’s WhatsApp application with the security Digit Code as shown in the screenshot below. Copy this code, enter it in the Digit Code text field, click the Verify button & you will be logged in successfully.

TOTP-based MFA

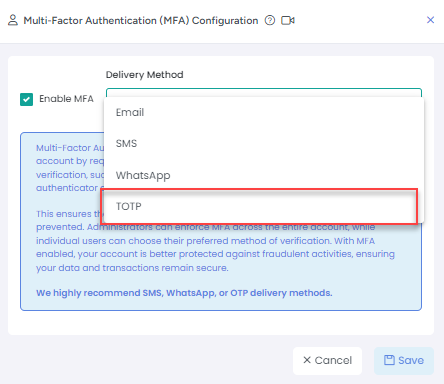
If you want to choose TOTP as the delivery method for MFA, then on the configuration screen, select TOTP and click the Save button.

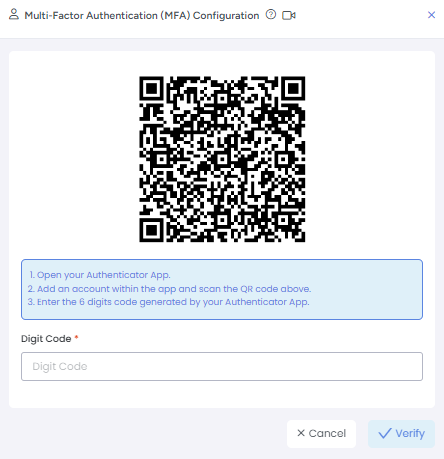
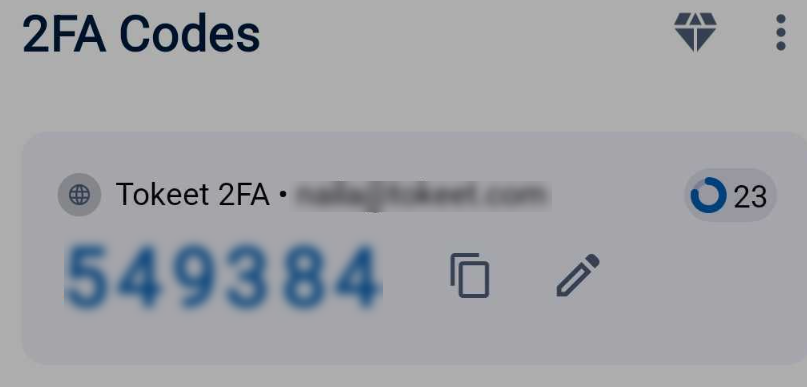
Next, the screen shown below will appear, where you will be required to scan the QR code on the authenticator app from your mobile. This will sync the account into the authenticator app & a code will be generated in the mobile authenticator app. Copy and paste the code as shown in the screenshot below & click the Verify button.

Note: You can use any authenticator app for this purpose which has the ability to scan QR Code. e.g. Google Authenticator: Download for Android | Download for iOS

After selecting TOTP as the delivery method, if you logout and go to the login screen you will see the message below after entering your username/password.

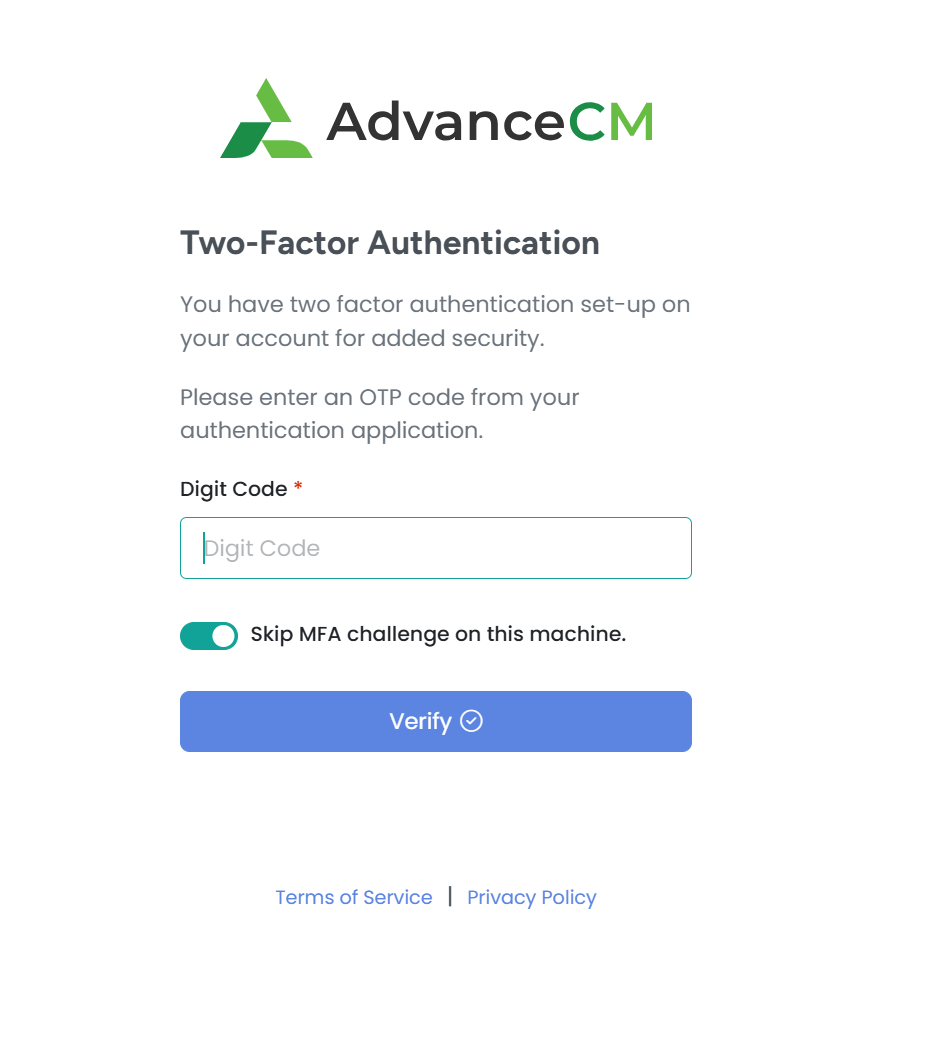
You will also get a message on your authenticator app on your mobile device with the security Digit Code as shown in the screenshot below. Copy this code, enter it in the Digit Code text field & click the Verify button to be logged in successfully.

Skip MFA challenge feature 

Users can skip MFA for a 15 days time period if they select the checkbox shown in the screenshot below when logging in.

This will bypass MFA and you will not be asked for any security code while logging in. It only expires if you do not log in on the same browser in 15 days, otherwise it will keep bypassing the MFA settings.

You can undo the above mentioned feature of bypassing MFA Challenge using the “Don’t Skip MFA” button below in your MFA Configurations settings and MFA will be enabled again on your browser.

Resend Code Feature

The “Resend Code” option allows you to request a new verification code if you did not receive the code, have lost the original one or the previous code has expired.

On the login page, when you navigate to the Multi-Factor Authentication screen, there is a “Resend Code” link with a timer of 120 seconds.  Once the timer reaches zero, the “Resend Code” link will be active allowing you to click on it to request a new code. 

When you select the ‘Resend Code’ option, a new verification code will be generated and sent via the delivery method you selected during configuration (e.g. email, SMS, WhatsApp or TOTP).

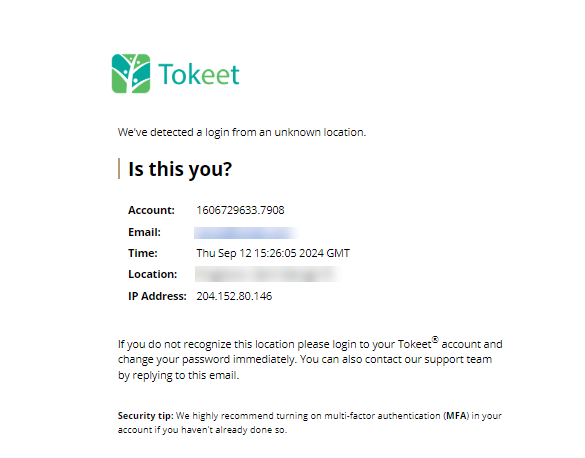
Unusual login detected Email

If a user is logged in from a different location i.e IP Address has changed from the previous IP address (at which security code was approved previously), this will trigger an email to be sent to you alerting you of an unusual log in.

Securing your Payment Gateways with MFA

Note: Only Admin users are able to add payment gateways and as a security measure, MFA must be enabled for that Admin user.

As always, please contact us with questions any time.  We're happy to help.
How did we do? Thank you! We appreciate your feedback.
Website Login
Copyright © 2026 advance.cm. All Rights Reserved.
No documents match your search.
Searching...